Showing posts with label Free Pattern. Show all posts

Tuesday, 7 February 2017

Wee bow

I have been making these wee little hair bows for a few years now. They've hand to glue on headbands or hair clips.
They're similar to the loom headbands I have made, pattern here.

The crocheted pattern is so quick and easy, here's what I do: 

Use the needle suggested on the yarn band. 
Chain 25 stitches. 
HDC in 2nd stitch from hook and access (24 HDC)
HDC across for two more rows, cut yarn and fasten off with very long tail.
Use short cast on thread to sew short ends of pieces together. 
Use the long tail to wrap around the middle of the piece to form the centre of the bow. Wrap it around about 10 - 15 times. Weave in ends on wrong side and you are DONE!

Wednesday, 15 January 2014

Loom Knit Headband - free pattern

I received so many repins on this pin:

that I decided to write up a quick pattern. Forgive me if I'm a bit lazy in explaining the terminology here, but it is SO darned easy you will barely need to read through this post to figure out how to get this finished product. It takes me about half an hour to make one - how's that for instant gratification?!

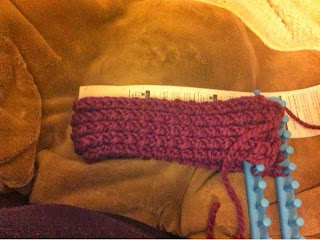
Start with a double rake loom and bulky yarn. The yarn I used was Lionbrand Wool-Ease Thick & Quick, which is super bulky "6." I also used my blue flat loom, which has 18 pegs on each side. Cast on 10 pegs, 5 on each side, using the figure 8 cast on. I don't know what this stitch is called, but it's the one that they "teach" you on the pamphlet that comes inside the loom package. It's not the double knit stitch, where you skip every other peg. You want to criss-cross cast on each peg, for a total of 10 pegs (5 on each side).
Start knitting! Just wrap each peg in criss cross fashion. When you get to the bottom two pegs, wrap straight across to the opposite end peg and "re-trace" your bottom row of yarn until you get to the top again. Then flip the bottom loop over each top loop, and repeat.
Keep going.
And going.
And going.
Until you reach about 9 inches when folded in half, or 18 inches total. If it's shorter, that's ok, this thing has some stretch to it.
I went a bit too long for this one so it was about 19.5-20 inches in total, but it still turned out fine.
I used a crochet hook to cast off. Place two live stitches on the crochet hook, yarn over and pull through both loops to make one loop. Then place the next live stitch onto the hook, and pull through both to make one loop. Repeat till you cast off all loops.
Leave a really long tail, then cut the working yarn and draw through last loop. Mine was maybe 5 feet long - you want lots of yarn here. So leave a long tail, and when you think it's enough, go ahead and add another foot.
Using the short end of the cast on yarn...
sew the two ends of the headband together.
My cast off edge is always tighter than the cast on edge, so make it match the shorter edge. You want it to dip together in the middle and be more narrow than the rest of the headband. It doesn't even need to look nice, because we'll be covering it up in the next step. Weave in that yarn end and cut.
Now take the long 5-foot cast off yarn tail, and wrap it around and around the narrow part. This effectively covers up the two edges that we just sewed together.
Decide what side looks better. Then weave your yarn around a few strands of the "wrong" side, to tack in place. Weave through a few more times, then cut yarn.
BOOM - DONE!
Make an army of them! Seriously, it knits up so quick in that bulky yarn, so go ahead, make more!


Here is the short version of the pattern: 

Loom Knit Headband - free pattern

Materials: 
Double rake loom with at least 10 pegs 
Bulky yarn (I used was Lionbrand Wool-Ease Thick & Quick, which is super bulky "6")
Loom pick
Crochet hook
Yarn needle

- Criss-cross cast on 10 pegs, 5 on each side, using the figure 8 stitch. 
- Wrap each peg in criss cross fashion. When you get to the bottom two pegs, wrap straight across to the opposite end peg and "re-trace" your bottom row of yarn until you get to the top again. 
- Using the loom pick, flip the bottom loop over each top loop, and repeat. 
- Keep going until you reach about 9 inches when folded in half, or 18 inches total. If it's shorter, that's ok, this thing has some stretch to it. 
- Cast off using a crochet hook. Place two live stitches on the crochet hook, yarn over and pull through both loops to make one loop. Then place the next live stitch onto the hook, and pull through both to make one loop. Repeat till you cast off all loops. 
- Leave a 5-foot long tail, then cut the working yarn and draw through last loop.
- Use the short end of the cast on yarn to sew the two ends of the headband together. Sew tightly, to make sure this portion is more narrow than the rest of the headband.
- Now take the long 5-foot cast off yarn tail, and wrap it around and around the narrow part, covering up the two edges that you just sewed together. Weave your yarn around a few strands of the "wrong" side, to tack in place. Weave through a few more times, then cut yarn. 

Tuesday, 17 December 2013

Chunky Headband

I have been working a lot lately with Lion Brand wool ease thick and quick, which is lovely to work with and knits up very quick. I made a headband in cream with a nice big flower. I also crocheted this hat in purple, for a friend.)
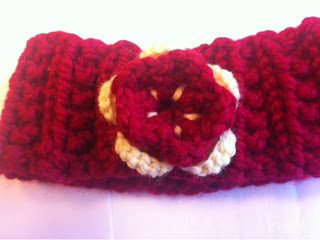
I made another chunky headband for a friend of mine, in cranberry. Perfect for Christmas-time!

Here's a very quick pattern for it: 

Lion Brand Wool Ease Thick and Quick
Size 9mm or 13 US

Cast on 60 stitches
Row 1: Knit 2, Purl 1 across
Repeat Row 1 for 10 more rows, or however wide you want the headband to be
Cost off in pattern
Sew ends together. I made a two-layer crocheted flowed and sewed it in place to cover this seam. 

That's it! The ribs pattern is stretchy so it fits most adult head sizes. Super warm and cozy :)

Tuesday, 16 April 2013

New square

Here's another square that I made up using the Vogue stitch a day calendar. The stitch was taken from the June 4, 2012 page, and it's called "Granite Relief Stitch."

Close up of the pattern:


Finished 12" x 12" square:
And here's the pattern. Enjoy!


Granite Relief Stitch 12" Square

I made up another square for the Gateway Theatre Knit and Purl charity event. The pattern is for a 12" square, and uses the granite relief stitch, which I found in the Vogue Knitting Stitch a Day Calendar.

Materials: 
DK weight yarn (mine was 70% acrylic, 30% wool)
5.5mm knitting needles

Granite Relief Stitch is worked over multiple of 2 stitches; over 4 rows:
Row 1 (RS): knit
Row 2: k2tog across row
Row 3: kfb across
Row 4: purl
Repeat rows 1 - 4

Pattern: 
Cast on 60
Knit 5 rows of garter stitch (knit every row); begin pattern:
R1: knit all sts
R2: k5, k2tog to last 5 sts, k5
R3: k5, kfb to last 5 sts, k5
R4: k5, purl to last 5 sts, k5
Repeat these four rows until piece measures 11 1/2 inches from beginning
Knit 5 rows of garter stitch.
Cast off, weave in ends - done!

Note: I make no claims to this beautiful stitch, it's from Vogue. I just wanted to share what I did. Hope you enjoy!


Thursday, 18 October 2012

Starburst Cowl

I really love this Starburst pattern from Vogue. I've made a washcloth with it and now I have finished the scarf I started ages ago. Except it's not a scarf, it's a cowl:


Pattern to follow!

Wednesday, 11 April 2012

Tiny Daisies Washcloth Pattern

I couldn't wait. I'm no good at making scarves - they take too long! I wanted to start and finish something in the same day, and I am currently obsessed with the Tiny Daisy stitch, so I whipped this up.

Tiny Daisies Washcloth Pattern
This pattern is for a washcloth/dishcloth/facecloth in 100% cotton. It uses the Tiny Daisy stitch, which I found in the Vogue Knitting Stitch a Day Calendar. My finished cloth is about 7.5 inches squared.

Materials: 
Bernat 100% cotton
4.5mm knitting needles
Yarn needle

Explanation of Tiny Daisy stitch:
Worked over multiple of 4 stitches plus 1; over 4 rows.
Daisy Stitch: P3tog [leave on needle], yo, P3tog again and drop from needle

Pattern: 
Cast on 37
R1: Knit
R2: K1, *Daisy st, k1; repat from * to end
R3: Knit
R4: K1, p1, *K1, Daisy st; rep from *; end k1, p1, k1
Repeat these four rows until piece makes a square
Finish off, weave in ends - done!

Note: I make no claims to this beautiful stitch, it's from Vogue. I just wanted to share what I did. Hope you enjoy!


Friday, 11 March 2011

Freebie Friday!

Here's a simple pattern I want to share. I intend for this to be a dog blanket, but it can also be a small baby blanket. It's nothing fancy, and I don't claim to have made up the pattern - it's more like a little recipe I whipped up, which I'm sure has been done before. In any case, here goes:


Chunky Dog Blanket
Materials:
Yarn: Marble Chunky (Bulky/12 ply)
Needles: Size 11 circulars
3 stitch markers
Abbreviations:
pm = place marker
sm = slip marker

Directions:
Cast on 60 stitches
Knit 5 rows in garter stitch (knit every row)
K 5, pm, K 25, pm, P 25, pm, K 5
K 5, sm, K 25, sm, P 25, sm, k 5
     Repeat this row for 30 rows or whatever gets you a square
K 5, sm, P 25, sm, K to end (25 st, plus 5 border sts)
     Repeat for 30 rows or whatever gets you a square
Knit 5 rows
Bind off in garter st
Block and give. Or keep. That's it!
Cast on:

Friday, 11 February 2011

Freebie Friday!

Hello world! It's Friday, and I wrote up a pattern, and I'm putting it up here for free, FREE I say! Here's a quick pattern for the birdies that I talked about here. Maybe you'd like to make yourself a little birdie? Click here to download the entire pattern, or read on...


 This is the first real pattern I've ever written up so please let me know if you find any mistakes. Thanks!